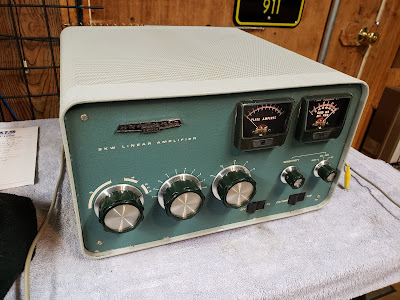
This is a few pics of a Heathkit SB-220 amp I repaired for a friend. It had a basket full of problems...HV supply was dropping voltage intermittently, band switch arcing, tuned input problems, bias issues, and more. These amps are real workhorses when in good operating condition. Here's a few pics and info on what was wrong with this beast.
This amp was a mess....I started by breaking it down, and I prefer to work on it with the high voltage safety defeated. DO NOT do this...it's very dangerous, and the voltages / current available in this power supply can easily kill you!
I pulled out my vintage high voltage probe to poke around in the HV supply...
I started right off by pulling and replacing a bunch of bad parts. Voltage divider resistors from the metering curcuit, RF choke from the grid circuit, blown LV filter cap...
One of the filter caps had literally blown the terminal right off the cap!
You can see the black area around the filter cap terminal in the upper LH filter bank...
I had to use my resistance substitution box to calibrate the HV meter function, those resistors were so far off and the original values didn't really bring the meter into calibration.
I replaced the bad cap and all of the bleeder resistors. All caps should have been replaced, but I had to stay in the owner's budget.
The HV curcuit is now working correctly and the meter is in calibration.
Using the HV probe to double check the supply voltage.
Tweaking the metering circuit to read correctly...
One of the tubes would loose the filament connection from time to time....
The paracytic suppressors and plate connections were also a mess...coating popped off of the resistors in spots, some nasty braid used in the plate circuit, etc. I ripped all that junk out and rebuilt it...
Winding new coils to install on a pair of new carbon film resistors for plate suppressors...
Plate suppressors all finished and installed...
Warming up and ready to test bias...
Added some silicon diodes to the bias string to get the bias current where it should be.
Applied a little drive, and found the tuned input to be all buggered up...
Had to remove the front panel to get to the tuned input. One of the silver mica caps was exploded, most always due to over drive. No telling what had been driven into this amp by a previous owner...
Band switch wafer repaired (was arcing) and bad tuned input caps were replaced.
Band switch wafer had arcing contact, way down there. Another tough one to get to for repairs!
I discovered one of the tube filament pins were not making good contact in the tube socket. I removed the springs, cleaned the pin clamps, and resprung the clamping mechanisms.
The metering switch was also broken. This is the replacement switch I installed...
This is the wafer from the broken metering switch...
While cleaning up, I removed the knobs and with a little Windex and toothbrush I gave them a good cleaning.
Driving the amp from a Yaesu FT-101 for testing...
Here it is, all cleaned up and ready to go. This was one of those projects, where the more things you repair, the more stuff you find that needs attention. It has had a rough life and problems were ignored at some point, but now it's back up to speed and running quite nicely.
Dave WB4IUY
www.WB4IUY.net


No comments:
Post a Comment
Questions or Comments?