I've been in Amateur Radio since 1974, and still find new and interesting things to do. I like to build, restore, and operate on the air. This blog has been running for many years, so be sure to check out "Jump to Posts on Specific Topics" in the RH column to drill down and find lots of stuff. Visit www.WB4IUY.net, email to wb4iuy@gmail.com, or leave comments here directly on my blogs.
Warm weather is here, and I'm back working on my tower again. The tower was destroyed during a storm back in April of 2016, that also did considerable damage to our home. At that time, the tower was cleaned, stripped of all antennas and cables, and cut off just under the 70' point. In November of 2016, it was restored as a simple dipole support for 40, 80, and 160 meter antennas to keep me on the air through the winter months.
The top of the 70' section, where I had to cut it off and make repairs...
View from 70'...
Temporary dipole mount with "winter" antennas at about 65'...
Over the weekend of June 10-11 2017, I decided it was time to get busy. Debbie AC4QD was my ground crew, and she worked to pull lots of things up to me with the garden tractor (and even by hand!!), depending on the weight. On Saturday, I had to climb to the 70' point, pull up a tag line and pulley, hoist a heavy duty electrical cord (for the AC drill) and tie it off on the tower top, and pull up various hand tools and supplies. A batch of 6" long, schedule-40 3/4" galvanized nipples were drilled, fitted, and double bolted into the top of the 70' section. This would serve as splices to allow the next tower section to be stacked. This stuff is hard to drill, and required 18 drill bit changes...not to mention lots of me straining my back while strapped into the top of the tower. Needless to say, my hands were raw after that piece of work. Once I finished that task, I came down the tower, assembled the gin pole, laid out all of the ropes, and prepared everything for the next day's work.
Top "splices" made from schedule-40 3/4" galvanized nipples...
Looking down the tower from about 60 feet...
Looking down at my truck from about 60 feet...
On Sunday, Debbie and I fired up the lawn tractor, tied it to the pull cable, and hoisted the gin pole to the top of the tower. It was attached to the top of the 70' section, Debbie snapped the rope to the next section of the tower, and used the lawn tractor to hoist it up. I got the 80' section set in place, and drilled / fitted / bolted... it had to be fastened to the splices I had installed the day before. Once again, it required loads of drilling, including another 18 drill bit changes. Wow, my hands were beginning to protest. Folks have said "why don't you wear gloves?"... I don't like the loss of dexterity from wearing gloves while on the tower.
Gin pole bolted to the top of the 70 foot section, ready to hoist the next piece of tower up...
Looking up the gin pole, after it was extended , about to hoist a piece of tower in place...
80 foot section in place, bolted in, and ready for more!
I'm almost ready to stack the rest of the tower. Some guy wire adjustments are in order before I go any further. I'm currently soaking the turn buckles in penetrant, as they've been in place since 1993 (24 years!) and are a little rough to turn. Once the guy wires are adjusted, I'll pull up more tower. I'd love to get this thing finished soon, I'm anxious to get my antenna farm back up!
This is an old Heathkit SB-630 Station Console I picked up at a swap meet some 20+ years ago. I bought it without a cabinet as a parts unit, with the intentions of buying a console in better condition later. I took it home and tossed it up on the shelf in the workshop. It was in pretty rough shape, and the story of it's life had something to do with a shipping experience that went horribly wrong.
The years passed by, and I kept looking at it... In recent years, I decided "what the heck", and thought I'd take a crack at resurrecting it from the scrapyard. I would take it down and tinker a few minutes here and there, bag the parts up, and putit back on the shelf. After looking over the unit a bit, I discovered there was as much bodywork to do, as there was electrical repairs needed. Most everything was there, but it was really bent and beat up. I couldn't believe the plastic bezel in the front wasn't broken...
The clock unit was broken away from the chassis, and had seized up over the years. The mounting bolts were sheared right off the bottom of the clock assembly.
I removed all of the knobs, the front panel, the clock assembly, and began working to straighten things up a bit.
After a little bit of light machine oil, I connected the clock motor to a 115 vac line cord, and it fired right up. All of the numbers were intact on the clock dials, and the motor ran quietly.
I found lots of broken wires on the rotary switches and under the chassis.
I removed everything from the panel, and began working the front panel with a rubber mallet and thick shop towel.
The front panel was pretty nasty, but it was more important that I be able to straighten the front panel. It's aluminum, so I found it malleable and pretty easy to work with.
The SWR meter and plastic parts cleaned up pretty well.
I let the front panel soak in the sink with some Dawn dish washing detergent a while. Heathkit panels are always a challenge to clean without damaging the lettering and such, and a gentile washing is about the best one can do.
Wow, here's the front panel, all clean and relatively straight!
A quick mockup with the knobs, after cleaning and washing those as well.
Beginning to reassemble the front panel...
I got the clock remounted on the chassis, rewired, and the white front sub-panel straightened and installed...
Wow, it's hard to believe this is the same SB-630 I started with. I didn't try to make it look like new, but I never do that with my Heathkit stuff... I'd rather clean, repair, and operate it with the character it earned over all of the years of it's operation.
Locating and repairing all of the various broken circuits. The timer function works pretty well, much to my surprise.
The SWR bridge has some parts rattling around inside. I removed the cover, straightened the sheet metal, and removed a stray nut and washer that was inside that had worked free from one of the coax connectors.
Here she is, installed in a cabinet I had picked up somewhere over the years and saved. Many of the Heathkit accessories use the same cabinet as the SB-600 Speaker.
The SB-630 is now installed in my SB-series station lineup. Notice the variation in the green face plate colors from unit to unit. There were about as many colors of these old green Heath units, as there were units produced. Heathkit was well known for it's variation in face colors and reported that it was due to the number of contractors it used over the years for production of their sheet metal components. This station is a lot of fun to operate, and gets regular use out in Studio B.
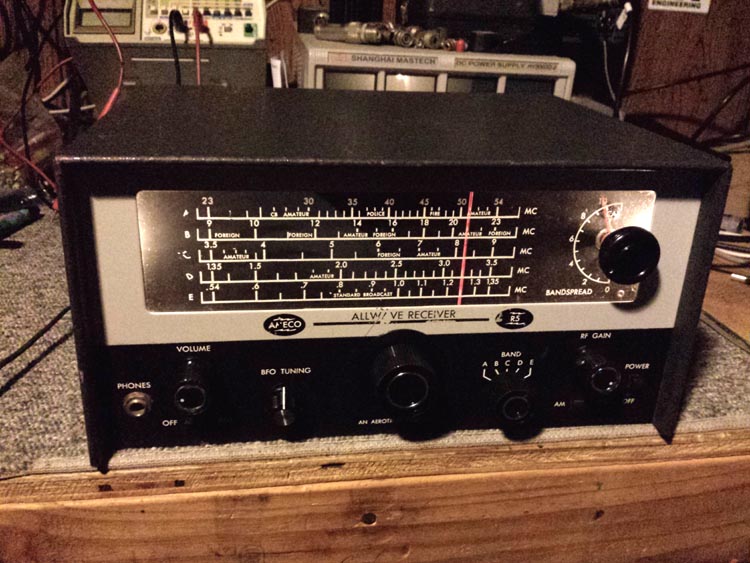
This is a neat little shortwave receiver I acquired through my friend Joe. He picked it up in some of his trading, and it was in unknown condition when he gifted it to me. I've always had a "soft spot" for Ameco stuff, and this came from the Aerotron facility in Raleigh NC sometime in the late 1960's. Here's a few pics of it before I got started with the repairs...
Considering the age, it was in pretty good condition, and just needed some minor TLC on the cosmetics, the bigger challenges were waiting inside :-) I sat about to discover the various issue with this rig, and make repairs to get it operational. This one had been "tinkered" in a bunch, from the looks of things. It seems it was actually the R5K, which I learned from Rodger WQ9E. was a version offered as a kit with the RF stages pre-assembled. Initially, it was totally dead, due to problems in the low voltage power supply. Stuff all around the band switch area was connected to
the wrong terminals, circuits bridged together, etc. I spent a bit of
time working through the schematic and correcting all of that, replaced a
shorted 1000uF electrolytic immediately after the rectifiers, cleaned
the controls, etc...typical stuff.
I ran through the initial alignment, and got it working, more or less. The receiver was full of images
in the lower SW bands and easily overloaded when connected to my full
size 160m dipole. It's kind of odd to me that the AGC is defeated when
in the CW mode. The instructions say to run the RF gain as low as
possible when receiving CW of SSB signals.
After the first jaunt of repairs and troubleshooting, I found the following problems that still needed attention:
-
The BFO didn't work. I couldn't detect
any oscillation in the BFO circuit, but I decided I'd had enough fun
for one day and tossed in the towel.
- There were no dial lamps, I needed to figure out what it was supposed to have, but that shouldn't be too tough.
- I found an oddity with the AF gain control...even when all the way down, some
audio was still passed to the audio amp. It's as if the low side of the
volume control wasn't completely at ground potential. The low side of the
control is connected to the circuit board ground. If I short the high
side or wiper to chassis ground, I get a weird & loud AC buzz. I can
measure about .004 vdc between the metal chassis and the circuit board
ground, even though they are clearly connected together. I decided that I needed to look into
that more.
- Knobs... whew, it had one of every type knob ever made on it :-) . I've got to do something about that, and fabricate a bottom cover (missing that) for it.
I parked the radio for a while, until I could get motivated to come back to it for more work. After a bit of a break, I cam back for more fun. I'm pretty sure this was surely was a kit receiver. In addition to tracking down problems via the
schematic and finding a bunch of things being incorrectly connected, I
found an interesting problem in the BFO circuit... I was poking
around the non-functional BFO circuit, and decided to test the BFO
transistor. It was good, but for come reason I decided to verify the
transistor leads as tested on my old B&K transistor tester to the
pads on the board, and found it had been incorrectly installed in the radio. Once I
rotated the transistor so the leads corresponded with the correct pc
board connections, it worked. Yipee, one more perplexing problem solved! Now that it is "sorta working", I shot a few videos on put them on Youtube...
This is a short video of it receiving an AM shortwave broadcast around 6.5mhz...
This is a short video of it running with the BFO operating...
This is a short video of it receiving a little SSB on the 75m ham band...
This is a little video of it receiving a bit of CW on the 80m ham band...
The next time I returned to the project, I found and repaired these other issues:.
- A PCB trace was burned out on the bottom of the board from a 1000uF
filer cap that was shorted. I bridged the trace and replaced the cap...
- A tap on one of the LO coils was disconnected. That was corrected easily...
-
A 10pf cap, originally intended as the coupling cap from the antenna
port, was bridged totally across the preselector assy L101/102/103 at
the band switch. This coupled the antenna downstream of the preselector,
and the radio was all noise.
- A 5v reg had blown and another
was tacked in under the board. I connected it correctly, but left it on
the bottom of the board. I need to move it topside where it's supposed
to be, but that's a non-issue right now.
- It goes without saying that the entire alignment was totally jacked up I found the instruction and service info on the web and went through a complete alignment. Wow, that made a huge difference!
- No dial lamps for whatever reason, just empty sockets. Easy fix. I located some bayonet style lamps in the shop and got those installed.
-
I couldn't turn the volume down below a fairly loud level. I checked
and the lo side of the pot was at ground, made no sense. After a quick
measurement, it became clear what the problem was... The 5k volume pot
wiper wouldn't go below 300 ohms when totally CCW. Weird, I have never seen that happen in over 40 years of repairing radio gear. I replaced the
pot and all was OK.
- Cleaned all controls & band switch
- I sorta found better knobs and replaced the goofy collection of knobs... Surprisingly enough, most of the knobs I found were a decent match to photos of the radio I found online. I'm still going to wath for a junker for those, but for now, I'm pretty happy.
- I repaired a problem with the BFO adjustment coil and repaired that, and found a small knob for the BFO coil shaft.
A pic of the receiver RF stages where I found several parts in the wrong place, stuff bridged over, and some wiring totally incorrect.
Burned trace on the board, low voltage regulator tacked in on the bottom of the board incorrectly, and other goofiness :-)
Knobs switched, front panel cleaned up, and looking much better!
Here's a few pics of the nearly completed radio, less the bottom cover that I have to cut and fit, next. It plays well, and is a fun little shortwave receiver. It was originally designed to possibly be paired with a simple transmitter for ham radio use, but it really wouldn't make a good station receiver for CW or SSB, though it does perform well on AM.
Here's an advertisement by Allied Radio from 1969 for the Ameco R5 Receiver, from the 1969 Allied Radio Catalog...
Lastly, here are a few more videos of the completed unit...
- Receiving a SW station around 4mhz
- Receiving some SSB on the 75m ham band, around 3650 khz
- Receiving Radio Havana Cuba at 5040 khz
This was a fun project, and a great little SWL radio to have in the shack. Thanks to my friend Joe for this great find and awesome gift!
I picked up an old Hallicrafters SX-42 at the Charlotte Hamfest. I had one of these back when I was a novice in 1974, and sold it in the early '80's. I've regretted it ever since. It's not that it was a great receiver, but I do have a soft spot for it. I was fortunate enough to get a spare parts rig and the matching R-42 speaker with it.
The SX-42 was Hallicrafters 'Top Of The Line' received in 1947. It sported crystal phasing and allowed for up to 6 increasingly tight stages of selectivity. By today's standards, it's a poor receiver for single signal CW operation. It is, however, an AWESOME receiver for AM signals from the ham bands or SWL. It operates from 535khz to 108 mhz in AM, CW, and FM. My intention is to pair it with an AM transmitter for use on the 160 meter band.
I got it fired up fairly easy, with very little work. I plan to totally recap it, implement the service bulletins to protect the band switch and fix other things, and bring it back to new cosmetically. Here are a few videos of it in operation, fresh out of the mothballs (spider webs)...
The AM Rally is coming, April 1st through 3rd. This event will be a great opportunity to work folks on rigs from Vintage through SDR... All technologies welcome! It's more of a social event than a contest, but will be loads of fun for all interested in the AM mode. Be sure to check out all the info online at http://amrally.com/ and check in on the air and enjoy the camaraderie between all operators of this neat, high fidelity vintage mode, with whatever you have to operate AM on! See you there!